For the last few years, I’ve been spending a lot of my free time working on side-projects. What I came to realize is that it’s quite important that I plan ahead and work in an organized fashion except for very small projects. Trello is one of my favorite software tools ever, and I’m going to talk about how I manage my current side-project using its free version in this article.
Why Tho?
I’m sure some people see this whole side-project management thing as an unnecessary overhead that’s just going to slow them down. But here’s the thing:
Heading towards the finish line on a side project pic.twitter.com/wHVJJBMDbx
— I Am Devloper (@iamdevloper) March 17, 2020
At the end of the day, you want to turn a cool idea into reality, on your own. That’s pretty much the meaning of a side-project. However, ideas lead to more ideas, as well as new problems to be solved. Sooner or later your head will explode because of every little thing you have to keep in mind (issues, ideas, problems, suggestions) about your project. If you use something like Trello, you can forget about all that until you have to actually deal with them.
Demo Project: TodoDock
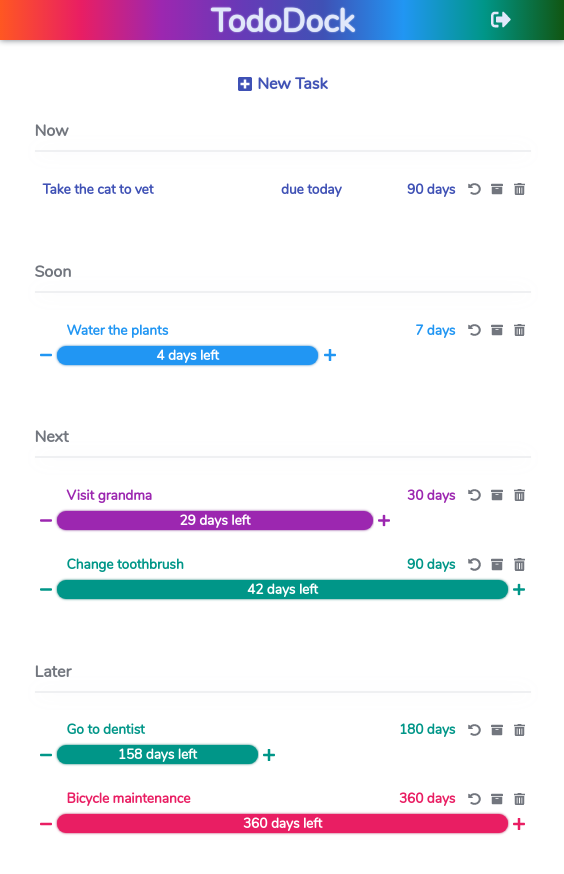
Before talking about how I manage it, let me briefly tell you about TodoDock, the side-project that I’ve been working on for the last few months. In a nutshell, TodoDock lets you keep track of your periodic tasks and sends you a reminder whenever one of your tasks is due soon. The task timers don’t get automatically reset unlike repeating calendar events; you have to reset the timer manually. Therefore you won’t receive another reminder until you’ve actually waited for another full period since the last time you’ve completed the task. Here’s what it looks like:

The current state (March 2020) of the app can be categorized as an MVP at best, as there’s still a lot of work to be done. And that’s where Trello comes into play:

Lists
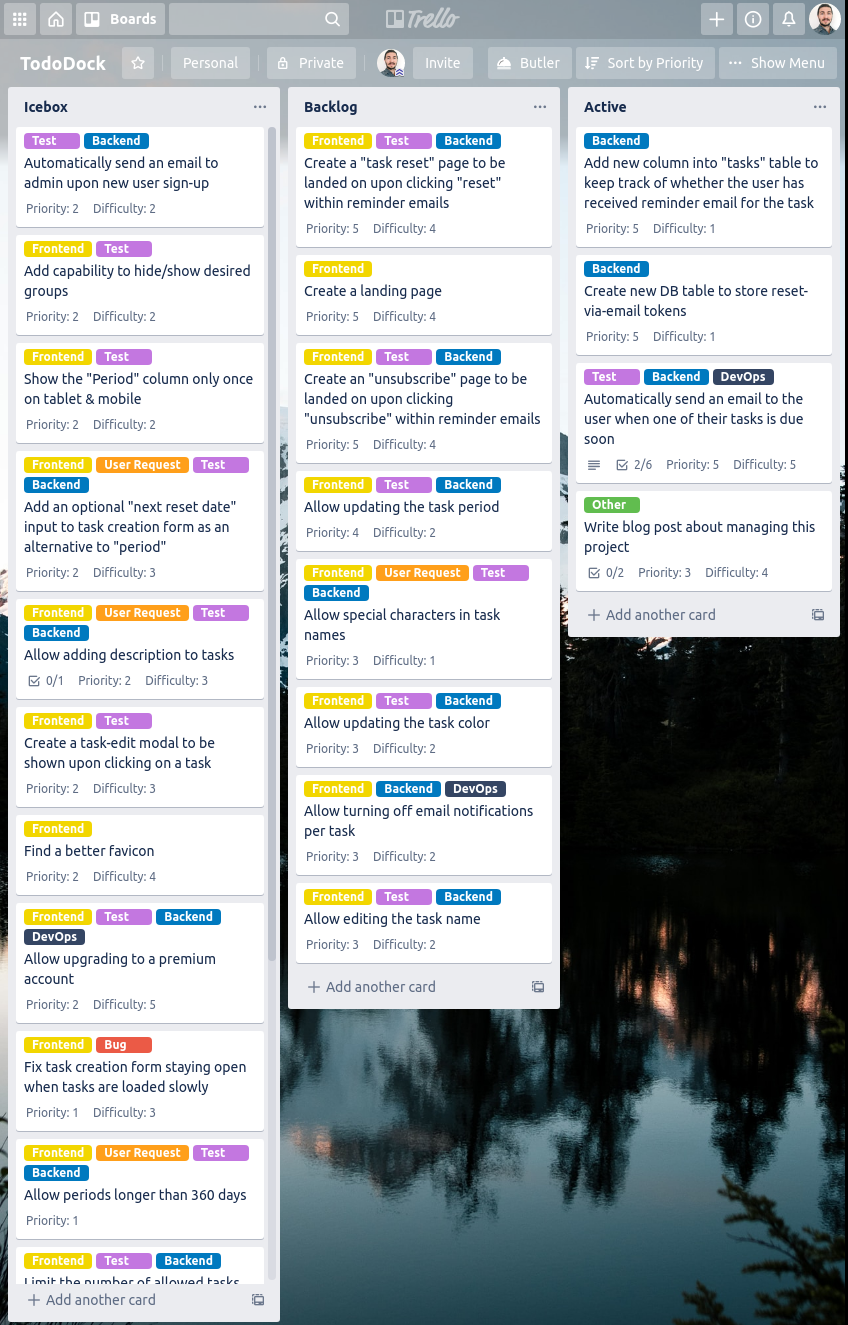
As you can see, I have three lists on the board: Icebox, Backlog and Active. Each task that I’m planning to work on soon is inside one of these. Obviously, the number of lists and the list names can be adjusted according to personal preference, as well as the size & nature of the project at hand. I have this particular setup because
- I like to separate high-priority tasks (Backlog) from low-priority ones (Icebox)
- I like to see the things I’m currently working on in a separate list (Active)
Cards, Tasks and Labels
Each card is a task. Simple as that. Here’s how I label my tasks:
- Backend: server-side coding
- Frontend: client-side coding
- Test: requires creating new tests
- DevOps: server administration/configuration, deployment, CI/CD and so on
- User Request: a feature request from one of the existing users
- Bug: pest control
- Other: none of the above
I assign labels to tasks primarily because then I can estimate their difficulties and priorities more accurately. The difficulty usually ends up higher if it has more than one of the first 4 labels. Similarly, the priority tends to increase if it has a User Request or a Bug label. More on priority and difficulty later…
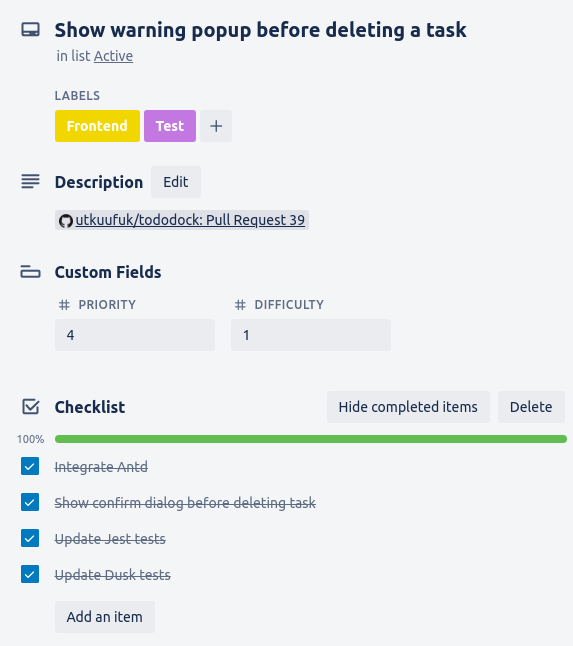
I just archive a task after completing it. I can always view an archived task if I need to. Here’s a task that I’ve archived recently:

I’m a big fan of using checklists to break tasks into even smaller steps. That way I can get a feeling of the progress I’ve made, which helps a lot especially for difficult tasks. Also, I link the Github PR in the description so that it’s easy to see the corresponding changes if I ever want to.
Butler and Custom Fields
There are a bunch of power-ups you can use on your board. You get only 1 power-up per board with the free version. You also get a default power-up called Butler which you can use to bring some automation to your board:
“Free Trello accounts also include a small taste of Butler with limited functionality.”
Even that small taste of Butler can actually prove very useful. I used it to define a board button for sorting the tasks by priority and difficulty. You can actually see that button in the board overview screenshot above. It’s called Sort by Priority and it appears next to the Show Menu button.
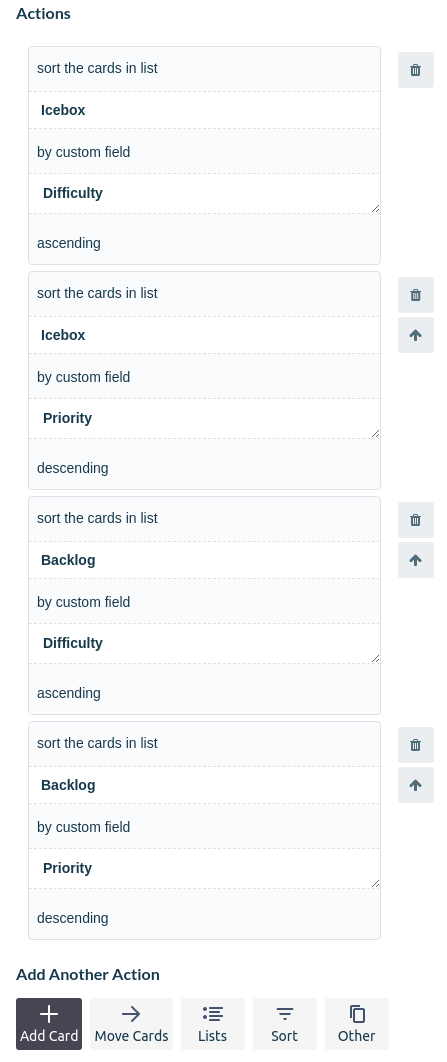
The problem is, you can’t assign a priority or a difficulty attribute to Trello cards by default. That’s why I spent my power-up slot on Custom Fields, which lets you define … wait for it … custom fields! Combined with Butler, it lets me sort all the cards within each list automatically. Here’s my Sort by Priority command:

You can see that the button triggers a command that runs a sequence of actions, top to bottom. That allows me to sort the equal-priority tasks additionally by their difficulty attributes. If you look at the screenshot of the board again, you’ll see that the tasks in each list are indeed sorted by those rules.
Other Cool Power-Ups
There are a few other power-ups that I would use if I didn’t have to upgrade to a paid account. I’ll just talk about a couple of those, in case some of you prefer them over Custom Fields.
Card Dependencies: It would be great to see if a task blocks (or is blocked by) other tasks. For instance, in my Archive list, there’s a task for automatically sending reminder emails to users. That task is in fact blocked by the two tasks above it, but it’s not obvious that there’s a dependency relationship between them.
Github: This lets you attach pull requests, issues and branches to your cards. You can see visual badges directly from the board view indicating whether a PR has been merged, the status checks and so on.
Bonus Tips & Tricks
Here’s my ten cents, my two cents is free.
When to create new tasks
My board isn’t a complete collection of everything that needs to be done. I create new tasks only when they become obvious to me while I work on the existing ones. Why, you ask?
- It’s impossible to think of every little thing in advance, and certainly not fun.
- There’s no benefit in creating a task which I’m not going to start working on soon.
- I rarely have to delete/update a task if I’ve created it soon before I start working on it.
Deciding what to work on next
I always assign an approximate priority & difficulty to new tasks, because I strongly believe that it’s important to work on what matters the most right now. For example, spending my time on making task groups collapsable (2nd task in Icebox, a nice-to-have visual feature) wouldn’t be a great idea when I haven’t even set up automated reminder emails yet, which is a core feature of TodoDock. So I put the low-priority (<=2) tasks into Icebox and high-priority ones into Backlog. After all the tasks are sorted, I just start working on the topmost task in Backlog, the lowest hanging fruit.
Limiting the task scope
I try to make my tasks as small as possible. I can mention quite a few reasons for that:
- Big tasks look scary to get started.
- It’s easier to focus on smaller tasks.
- It’s easier to write tests for smaller features.
- It’s easier to revert a change (using Git) if it has a clear scope.
- It’s hard to break big tasks into a few checklist items for progress tracking.
- A big task might contain sub-tasks with different priority levels, which can be scheduled independently.
That’s it, I hope you found this useful. Feel free to reach out if you have any comments or questions. Also, don’t forget to subscribe if you want to get notified when I post new stuff.